Pages

Friday, February 12, 2016

Installing Microsoft Exchange Server 2016

I’ve recently been assisting clients with Microsoft Exchange Server 2016 migrations and thought I’d write a quick blog post demonstrating the deployment process.

Note that the full TechNet Planning and deployment guide can be found at the following URL:

https://technet.microsoft.com/en-us/library/aa998636(v=exchg.160).aspx

Prerequisites

I won’t go into too much details but here are some requirements that are important to be aware of:

  • Exchange 2007 coexistence is not supported
  • Exchange 2010 SP3 with RU11 is required for coexistence
  • Exchange 2013 SP3 with CU10 is required for coexistence
  • Forest functional level needs to be at least Windows Server 2008
  • OS must be Windows Server 2012 or 2012 R2
  • Supported clients include:
    • Outlook 2016

    • Outlook 2013

    • Outlook 2010 with KB2965295

    • Outlook for Mac for Office 365

    • Outlook for Mac 2011

More information about the requirements can be found here: https://technet.microsoft.com/en-us/library/aa996719(v=exchg.160).aspx

Begin by installing the prerequsites onto the Exchange server with the following PowerShell cmdlet:

Install-WindowsFeature AS-HTTP-Activation, Desktop-Experience, NET-Framework-45-Features, RPC-over-HTTP-proxy, RSAT-Clustering, RSAT-Clustering-CmdInterface, RSAT-Clustering-Mgmt, RSAT-Clustering-PowerShell, Web-Mgmt-Console, WAS-Process-Model, Web-Asp-Net45, Web-Basic-Auth, Web-Client-Auth, Web-Digest-Auth, Web-Dir-Browsing, Web-Dyn-Compression, Web-Http-Errors, Web-Http-Logging, Web-Http-Redirect, Web-Http-Tracing, Web-ISAPI-Ext, Web-ISAPI-Filter, Web-Lgcy-Mgmt-Console, Web-Metabase, Web-Mgmt-Console, Web-Mgmt-Service, Web-Net-Ext45, Web-Request-Monitor, Web-Server, Web-Stat-Compression, Web-Static-Content, Web-Windows-Auth, Web-WMI, Windows-Identity-Foundation, RSAT-ADDS

image

Download and install the following two components:

.Net Framework 4.5.2
https://support.microsoft.com/en-us/kb/2901907
NDP452-KB2901907-x86-x64-AllOS-ENU.exe

Microsoft Unified Communications Managed API Core Runtime, version 4.0
https://www.microsoft.com/en-us/download/details.aspx?id=34992
UcmaRuntimeSetup.exe

image

Installing Exchange 2016

If the Schema, AD and Domain prep needs to be executed independently from the actually install, simply execute the following switches with the Exchange 2016 setup.exe executable:

  • setup.exe /PrepareSchema /IAcceptExchangeServerLicenseTerms
  • setup.exe /PrepareAD /IAcceptExchangeServerLicenseTerms
  • setup.exe /PrepareDomain /IAcceptExchangeServerLicenseTerms

**Note that the schema, AD and domain prep will also be automatically executed with the installation wizard.

Proceed with running the setup.exe executable from the Exchange 2016 installation binaries:

image

Proceed through the wizard:

imageimage

imageimage

image

Select the Mailbox role to be installed (you cannot collocate Mailbox and Edge Transport roles together):

imageimage

Specify the installation path:

image

Specify whether malware scanning should be turned on:

image

imageimage

Start the installation:

imageimage

imageimage

imageimage

image

… and that’s it.  Exchange Server 2016 is now installed.  Proceed with the configuration of the new server as required.

As an extra note I’d like to include here for my future reference, the following PowerShell script designed for Exchange 2013 for relocating the logging directories also works for 2016:

Move Logging in Exchange 2013 via Powershell
http://social.technet.microsoft.com/wiki/contents/articles/22479.move-logging-in-exchange-2013-via-powershell.aspx

Wednesday, February 10, 2016

Creating a Citrix NetScaler High Availability pair without wiping out an existing configuration

Problem

I’ve received quite a few calls over the past year from clients and colleagues about situations where they had an existing single node NetScaler appliance deployed and decided to create an HA pair at a later time but noticed that adding a new NetScaler with no configuration to create the HA pair would wipe out the configuration of the existing node.  This issue has happened to me as well in the past and it’s one of the worst situations to be in if you did not have backup so this blog post serves to demonstrate how to add a new node to create an HA pair while keeping the configuration.

First off, I’ve tested creating the HA pair by adding the other node from:

  1. The node that already contains configuration
  2. The node that does not contain configuration

Both yield the same results where the new NetScaler without any configuration would assume the Primary role for the Master State.  The following screenshots demonstrates what happens when I add the NetScaler with the IP address 10.32.30.101 without any configuration to an existing NetScaler with configuration with the IP address 10.32.30.100:

image

image

image

Note how the NetScaler with the IP address 10.32.30.101 which contains no configuration has assumed the Primary role of the Master State thus wiping out the configuration of the existing NetScaler with configuration with the IP address 10.32.30.100.  The result would be the same if you decided to use the NetScaler with configuration to add the other node without configuration.

Solution

To avoid having the new NetScaler with no configuration assume the Primary role of the Master State status, log onto the NetScaler appliance with no configuration, navigate to High Availability and open up the properties of the node:

image

From within the Configure HA Node properties window, change the High Availability Status from ENABLED (Actively Participate in HA) to STAY SECONDARY (Remain in Listen Mode):

imageimage

image

With the new High Availability Status set to STAY SECONDARY (Remain in Listen Mode), proceed to add the node with the configuration:

image

Once added, you will see that the node without configuration will remain as Secondary while the newly added node with configuration is Primary:

image

Proceed by editing the properties of the Secondary node (the new NetScaler without configuration) and change the High Availability Status back to ENABLED (Actively Participate in HA):

image

image

You should now have a new NetScaler HA pair with the configuration of the single node appliance.

Monday, February 8, 2016

Unable to complete installing Skype for Business Server 2015 KB3061064 update

Problem

You attempt to install the Skype for Business Server 2015 KB3061064 (https://support.microsoft.com/en-us/kb/3061064) but notice that the installation fails with:

Checking service status. This may take a couple minutes...

System.Management.Automation.CommandNotFoundException: The term 'Get-CsWindowsSe

rvice' is not recognized as the name of a cmdlet, function, script file, or oper

able program. Check the spelling of the name, or if a path was included, verify

that the path is correct and try again.

at System.Management.Automation.Runspaces.PipelineBase.Invoke(IEnumerable inp

ut)

at SkypeServerUpdateInstaller.PowershellRunner.RunCmd(String script, ICollect

ion`1& errors)

at SkypeServerUpdateInstaller.PowershellRunner.RunScript(String scriptFileNam

e, ICollection`1& errors)

at SkypeServerUpdateInstaller.MachineStatusChecker.Check(String& errorMessage

)

KB3097644 for OcsCore.msp was already installed... Skipping

KB3097649 for UcmaRuntime.msp was already installed... Skipping

KB3097646 for Caa.msp was already installed... Skipping

KB3097708 for OCSMCU.msp was already installed... Skipping

Installing 5 of 1 Updates for [Skype for Business Server 2015 6.0.9319.102]

Installing KB3097645 for Server.msp

ERROR 1603: Server.msp had errors installing.

KB3097642 for WebComponents.msp was already installed... Skipping

KB3097647 for EnterpriseWebApp.msp was already installed... Skipping

SkypeForBusinessPerfCounters.msi was already installed... Skipping

rewrite_2.0_rtw_x64.msi was already installed... Skipping

image

There were errors during the installation process. For details, see the log file at C:\KB3061064\Skype_patchinstallerlog-<serverName>-[2016-02-06][12-35-56].txt

image

Reviewing the Skype for Business Server 2015 Update Installer window shows that all the components were successfully updated aside from the Update for Skype for Business Server 2015:

image

Opening and reviewing the log:

C:\KB3061064\Skype_patchinstallerlog-<serverName>-[2016-02-06][12-35-56].txt

… dsplays the following output:

2/6/2016 12:35:56 PM] Starting Skype for Business Server 2015 Cumulative Update Installer, version 6.0.9319.102
[2/6/2016 12:35:56 PM] Checking service status. This may take a couple minutes...
[2/6/2016 12:35:57 PM] Exception: System.Management.Automation.CommandNotFoundException: The term 'Get-CsWindowsService' is not recognized as the name of a cmdlet, function, script file, or operable program. Check the spelling of the name, or if a path was included, verify that the path is correct and try again.
   at System.Management.Automation.Runspaces.PipelineBase.Invoke(IEnumerable input)
   at SkypeServerUpdateInstaller.PowershellRunner.RunCmd(String script, ICollection`1& errors)
   at SkypeServerUpdateInstaller.PowershellRunner.RunScript(String scriptFileName, ICollection`1& errors)
   at SkypeServerUpdateInstaller.MachineStatusChecker.Check(String& errorMessage)
[2/6/2016 12:35:57 PM] Embedded patch description: Update for Core Components
[2/6/2016 12:35:57 PM] Embedded patch OcsCore.msp is referred by KB #3097644
[2/6/2016 12:35:57 PM] Embedded patch OcsCore.msp can be researched at URL
http://support.microsoft.com/?kbid=3097644
[2/6/2016 12:35:57 PM] Embedded patch OcsCore.msp is at version 6.0.9319.102
[2/6/2016 12:35:57 PM] Product with GUID {A766C25B-A1D1-4711-A726-AC3E7CA4AAB3} is at version 6.0.9319.102 and is associated with patch OcsCore.msp which this installer has at version 6.0.9319.102
[2/6/2016 12:35:57 PM] OcsCore.msp, version 6.0.9319.102 is up-to-date on this server.
[2/6/2016 12:35:57 PM] Embedded patch description: Update for Core Runtime 64-bit
[2/6/2016 12:35:57 PM] Embedded patch UcmaRuntime.msp is referred by KB #3097649
[2/6/2016 12:35:57 PM] Embedded patch UcmaRuntime.msp can be researched at URL
http://support.microsoft.com/?kbid=3097649
[2/6/2016 12:35:57 PM] Embedded patch UcmaRuntime.msp is at version 6.0.9319.102
[2/6/2016 12:35:57 PM] Product with GUID {902F4F35-D5DC-4363-8671-D5EF0D26C21D} is at version 6.0.9319.102 and is associated with patch UcmaRuntime.msp which this installer has at version 6.0.9319.102
[2/6/2016 12:35:57 PM] UcmaRuntime.msp, version 6.0.9319.102 is up-to-date on this server.
[2/6/2016 12:35:57 PM] Embedded patch description: Update for Conferencing Attendant
[2/6/2016 12:35:57 PM] Embedded patch Caa.msp is referred by KB #3097646
[2/6/2016 12:35:57 PM] Embedded patch Caa.msp can be researched at URL
http://support.microsoft.com/?kbid=3097646
[2/6/2016 12:35:57 PM] Embedded patch Caa.msp is at version 6.0.9319.102
[2/6/2016 12:35:57 PM] Product with GUID {73472766-329F-4fd8-91AF-458E702498CF} is at version 6.0.9319.102 and is associated with patch Caa.msp which this installer has at version 6.0.9319.102
[2/6/2016 12:35:57 PM] Caa.msp, version 6.0.9319.102 is up-to-date on this server.
[2/6/2016 12:35:57 PM] Embedded patch description: Update for Conferencing Server
[2/6/2016 12:35:57 PM] Embedded patch OCSMCU.msp is referred by KB #3097708
[2/6/2016 12:35:57 PM] Embedded patch OCSMCU.msp can be researched at URL
http://support.microsoft.com/?kbid=3097708
[2/6/2016 12:35:57 PM] Embedded patch OCSMCU.msp is at version 6.0.9319.102
[2/6/2016 12:35:57 PM] Product with GUID {6184864A-8DCD-44DE-885D-B6C0AF668033} is at version 6.0.9319.102 and is associated with patch OCSMCU.msp which this installer has at version 6.0.9319.102
[2/6/2016 12:35:57 PM] OCSMCU.msp, version 6.0.9319.102 is up-to-date on this server.
[2/6/2016 12:35:57 PM] Embedded patch description: Update for Response Group Service
[2/6/2016 12:35:57 PM] Embedded patch RGS.msp is referred by KB #3097643
[2/6/2016 12:35:57 PM] Embedded patch RGS.msp can be researched at URL
http://support.microsoft.com/?kbid=3097643
[2/6/2016 12:35:57 PM] Embedded patch RGS.msp is at version 6.0.9319.102
[2/6/2016 12:35:57 PM] Product with GUID {11CFB169-07EA-489D-BF8C-D8D29525720E} is at version 0.0 and is associated with patch RGS.msp which this installer has at version 6.0.9319.102
[2/6/2016 12:35:57 PM] Product with GUID {11CFB169-07EA-489D-BF8C-D8D29525720E} is not installed on this server.
[2/6/2016 12:35:57 PM] Embedded patch description: Update for Skype for Business Server 2015
[2/6/2016 12:35:57 PM] Embedded patch Server.msp is referred by KB #3097645
[2/6/2016 12:35:57 PM] Embedded patch Server.msp can be researched at URL
http://support.microsoft.com/?kbid=3097645
[2/6/2016 12:35:57 PM] Embedded patch Server.msp is at version 6.0.9319.102
[2/6/2016 12:35:57 PM] Product with GUID {A593FD00-64F1-4288-A6F4-E699ED9DCA35} is at version 6.0.9319.0 and is associated with patch Server.msp which this installer has at version 6.0.9319.102
[2/6/2016 12:35:57 PM] Server.msp, version 6.0.9319.102 is NOT up-to-date on this server.
[2/6/2016 12:35:57 PM] Embedded patch description: Update for Web Components Server
[2/6/2016 12:35:57 PM] Embedded patch WebComponents.msp is referred by KB #3097642
[2/6/2016 12:35:57 PM] Embedded patch WebComponents.msp can be researched at URL
http://support.microsoft.com/?kbid=3097642
[2/6/2016 12:35:57 PM] Embedded patch WebComponents.msp is at version 6.0.9319.102
[2/6/2016 12:35:57 PM] Product with GUID {2A65AB9C-57AD-4EC6-BD4E-BD61A7C583B3} is at version 6.0.9319.102 and is associated with patch WebComponents.msp which this installer has at version 6.0.9319.102
[2/6/2016 12:35:57 PM] WebComponents.msp, version 6.0.9319.102 is up-to-date on this server.
[2/6/2016 12:35:57 PM] Embedded patch description: Update for Skype for Business Web Application
[2/6/2016 12:35:57 PM] Embedded patch EnterpriseWebApp.msp is referred by KB #3097647
[2/6/2016 12:35:57 PM] Embedded patch EnterpriseWebApp.msp can be researched at URL
http://support.microsoft.com/?kbid=3097647
[2/6/2016 12:35:57 PM] Embedded patch EnterpriseWebApp.msp is at version 6.0.9319.102
[2/6/2016 12:35:57 PM] Product with GUID {A185550F-9598-49B1-907A-E0BF5FBED77E} is at version 6.0.9319.102 and is associated with patch EnterpriseWebApp.msp which this installer has at version 6.0.9319.102
[2/6/2016 12:35:57 PM] EnterpriseWebApp.msp, version 6.0.9319.102 is up-to-date on this server.
[2/6/2016 12:35:57 PM] Product with GUID {3F699640-D097-457B-8229-0CE8F7B31DCB} is at version 6.0.9319.102 and is associated with patch SkypeForBusinessPerfCounters.msi which this installer has at version 6.0.9319.102
[2/6/2016 12:35:57 PM] SkypeForBusinessPerfCounters.msi, version 6.0.9319.102 is up-to-date on this server.
[2/6/2016 12:35:57 PM] Rewrite Module is at version 7.1.1952.0 and is associated with patch rewrite_2.0_rtw_x64.msi which this installer has at version 7.1.1952.0
[2/6/2016 12:35:57 PM] rewrite_2.0_rtw_x64.msi, version 7.1.1952.0 is up-to-date on this server.
[2/6/2016 12:35:59 PM] Beginning installation of selected binaries...
[2/6/2016 12:35:59 PM] Executing command: msiexec.exe  /update "C:\KB3061064\Server.msp" /passive /norestart /l*vx "C:\KB3061064\Server.msp-conBMLYNCSTD01-[2016-02-06][12-35-59]_log.txt"
[2/6/2016 12:36:12 PM] ERROR 1603: Server.msp had errors installing.
[2/6/2016 12:39:33 PM] ERROR: SkypeServerUpdateInstaller failed to successfully install all patches

image

Opening the LCSSetup_Commands in the %userprofile%\appdata\temp folder reveals the following:

--------------------------------------------------------------------------------------------

02/06/201612:36:08

powershell -noprofile -command " & Install-CsDatabase -Update -DatabaseType Registrar -Verbose "

--------------------------------------------------------------------------------------------

& : The term 'Install-CsDatabase' is not recognized as the name of a cmdlet,

function, script file, or operable program. Check the spelling of the name, or

if a path was included, verify that the path is correct and try again.

At line:1 char:4

+ & Install-CsDatabase -Update -DatabaseType Registrar -Verbose

+ ~~~~~~~~~~~~~~~~~~

+ CategoryInfo : ObjectNotFound: (Install-CsDatabase:String) [],

CommandNotFoundException

+ FullyQualifiedErrorId : CommandNotFoundException

image

Solution

I performed quite a few troubleshooting steps but was unable to get past the error and what finally worked for me was to rerun the Setup or Remove Skype for Business Server Components in the Skype for Business Server 2015 – Deployment Wizard console:

image

image

Then rerun the update installer:

image

Sunday, February 7, 2016

Changing Exchange Server 2013 UM dial plan for Unified Messaging enabled users

I was recently told by our telephony engineer that we needed to create a new UM dial plan with the URI Type set as SIP URI for our internal users that are using Exchange Unified Messaging for voicemail because of the migration from Exchange 2007 to 2013:

image

The GUI did not provide a way to simply move user accounts from one UM dial plan to another so I resorted to PowerShell cmdlets and thought it would be a good idea to document the process then blog it so I can reference it in the future.

Step #1 – Identify users in the legacy UM dial plan

Begin by identifying the users that you intend on moving from the legacy UM dial plan with the following cmdlet:

Get-UMMailbox | where {$_.UMDialPlan -eq "Mintflower"} | Format-Table –Wrap -AutoSize

image

The list displayed from the cmdlet above will list the users currently enabled for Unified Messaging with their dial plan set to the legacy one.

Step #2 – Disable Unified Messaging for users in legacy dial plan while retaining configuration

Next, execute the following cmdlet to disable the users for unified messaging but retain their configuration such as extensions:

Get-UMMailbox | where {$_.UMDialPlan -eq "Mintflower"} | Disable-UMMailbox -KeepProperties $True -confirm:$false

The cmdlet will produce output similar to the following listing the users that have been affected:

image

**Note that if the list above continues more users than the screen buffer has, pipe out the output with > C:\UMusers.txt

Document the PrimarySMTPAddress field for each user in the output above.

Step #3 – Enable users for Unified Messaging assigned to the new UM dial plan

With the users’ PrimarySMTPAddress field list, execute the following for each user:

Enable-UMMailbox -Identity enorville@ccs.bm -UMMailboxPolicy “Bakery Lane Default Policy

Substitute the email address and the UMMailboxPolicy as required.

Saturday, February 6, 2016

Configuring Load Balanced LDAPS Load Balancing Virtual Server on NetScaler version 11

I recently had to configure a Load Balanced LDAPS Load Balancing Virtual Server on a NetScaler version 11 for a client and since the procedure is slightly different than earlier versions, I took the time to document the steps so I can write this post for future reference.  The Netscaler used in this example will be a VPX 200 NS11.0 62.10.nc:

image

Step #1 – Create Server Objects

Begin by logging into the NetScaler appliance and navigating to Traffic Management > Load Balancing > Servers and create the server objects that represent your domain controllers that will be used in the load balancing virtual server:

image

For this example, I will be creating 3 server objects for 3 Domain Controllers:

image

image

Step #2 – Create LDAPS Monitor

With the server objects created, navigate to Management > Load Balancing > Monitors to create the monitor object that will reach out to the domain controllers and execute an LDAPS query to verify the health of the server:

image

Type in a name to represent this monitor that will query servers to verify LDAPS is operational, select LDAP as the Type:

image

Leave all of the text fields as the default then scroll all the way down to the bottom and select the Secure checkbox:

image

**Note that previous to NetScaler version 11, we would have had to customize the regular LDAP monitor script (nsldap.pl) to perform LDAPS health verification.

Scroll back up to the top of the page and select the Special Parameters tab:

image

Proceed to fill in the following fields:

Script Name: nsldap.pl

Dispatcher IP: 127.0.0.1

Dispatcher Port: 3013

Base DN: dc=yourDomain,dc=com

Bind DN: svc_netscaler@yourDomain.com

Filter: cn=builtin

Password: <password for the service account>

image

Proceed by clicking on the Create button to create the monitor:

image

Step #3 – Create Service Group

With the server objects representing the domain controllers and monitor capable of querying to verify the health of LDAPS, continue by creating a service group that represents the domain controllers that will represent a physical site or a logical separation from other domain controllers in your environment. For the purpose of this example, I will be creating a group that represents domain controllers that reside in the same datacenter. Navigate to Management > Load Balancing > Service Groups and click on the Add button:

image

Type in a name to represent the Load Balancing Service Group then select SSL_TCP as the Protocol then click on the OK button to continue:

image

Proceed by clicking on the No Service Group Member item:

image

In the Create Service Group Member window, click on the Server Based option:

image

image

Then select the server objects that were created earlier to represent the domain controllers:

image

With the servers selected, put in the value 636 as the Port number then click on the Create button to create the Service Group Member:

image

Continue by clicking the OK button:

image

With the Service Group Members assigned, continue by clicking on the Monitors button on the right side of the menu then click on the No Service Group to Monitor Binding item:

image

image

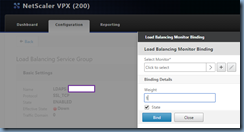
In the Load Balancing Monitor Binding window, click on the Select Monitor option:

image

Select the LDAPS monitor that was created earlier in Step #2:

image

Click on the Bind button:

image

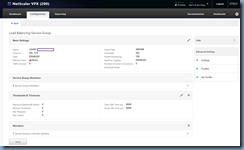
Before navigating out of the Load Balancing Service Group, click on the 3 Service Group Members item:

image

Select one of the domain controllers and then click on Monitor Details:

image

Verify that the Last Response status is labeled as Success – Probe succeeded:

image

Repeat for the other domain controllers then proceed to exit out of the monitors then click on Done to complete the creation of the Load Balancing Service Group:

image

It’s important to note that the Effective State may be labeled as DOWN after the initial creation but a few refreshes of the console should list it as being up:

image

image

Step #4 – Create the Load Balancing Virtual Server

With the server, the monitor and the service group representing the domain controllers created, proceed by importing the certificate that will be used to secure the traffic to the load balancing virtual server’s VIP when clients attempt to connect to the FQDN that resolves to the IP address:

image

Then create a new load balancing virtual server:

image

Enter a name to represent the load balancing virtual server, SSL_TCP as the Protocol, a unique IP address for this virtual server, and 636 for the Port and the Ok button to apply the configuration:

image

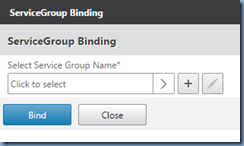
Continue by click on the No Load Balancing Virtual Server ServiceGroup Binding item:

image

Select the service group that was created earlier:

image

image

Click on the Bind button:

image

Click on the Continue button:

image

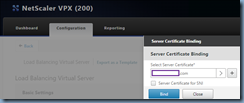
Click on the No Server Certificate item:

image

Select the certificate used for this load balancing virtual server:

image

image

Click on the Bind button to bind the certificate to the load balancing virtual server:

image

Click on the Continue button:

image

Then the done button to complete the creation:

image

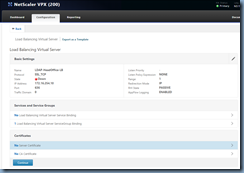
The new load balancing virtual server representing the 3 domain controllers for LDAPS configuration is now ready to be used:

image